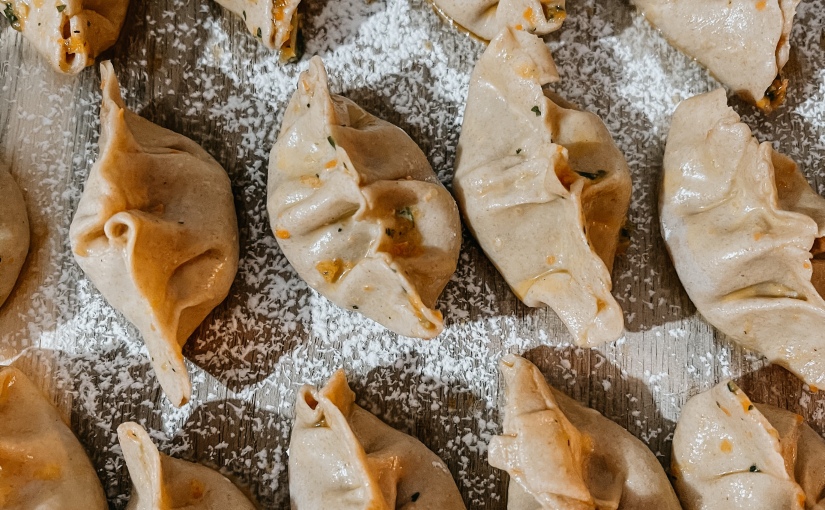
My children love our homemade dumplings. There was always a convenient element for us. Those little wrappers, all ready to work with.
A little while ago we ran out and had to make some quick smart. I couldn’t believe how easy it was and you can imagine the soft delicate texture it added to the filling.
I will note here I try to jam pack as many veggies as I can in here so it may not resemble the most authentic recipe, yet nonetheless delicious.
Ingredients for Wonton Wrappers:
2 1/2 cups of all purpose flour
1/2 tsp salt
2/3 cup of hot water
Corn flour, rice flour or plain flour for dusting.
Ingredients for Filling:
(Use anything you can or want really… we use the last bits and pieces in our fridge).
2 Garlic Cloves
2 inch piece of Ginger
2 Shallots
5 Shiitake Mushrooms
1 Carrot
1 Zucchini
1 Tbsp of Sesame Oil
2 tsp Soy Sauce
Method for Wonton Wrappers:
Mix flour and salt in a bowl. Add water whilst stirring to combine. Transfer to a working surface and kneed for 3-5 minutes. Form to a ball, wrap in cling wrap and chill for 30 minutes.
Divide the dough into two pieces. Dust the surface with cornstarch and roll it out to 2mm thick.
Cut round pieces using a cookie/cup/scone cutter. Form new balls and re roll, cutting and using all the dough.
Dust the wrappers with cornstarch before stacking or refrigerate or freeze for later.
Meanwhile place all the fillings in a blend and pulse into a fine stuffing.
Assemble your Wontons:
Take a wrapper and place a heaped teaspoon into the centre. Brush the edges in water. Fold into the fan style or anyway you like. Please be sure to seal all of it.
Fry the Wontons for a minute or two until the base is nice and brown. Add 1/4 cup of water to the pan, cover with a lid and steam for 7-8 minutes.
Make a simple dipping sauce with
3 Tbsp Soy Sauce
2 Tbsp Rice Vinegar
2 tsp Sesame Oil
A little fresh ginger and garlic.
Serve with fried sesame seeds and chopped shallots on top.
I can hear you saying it LOUD and CLEAR! And aren’t we seeing so many more people, particularly mothers making the change. Swapping for the natural, low tox life style. Through chatting with friends and mothers groups, I noticed a wave of people really starting to think about how they ‘did life’ in the home.
I’m often asked why I chose the low tox lifestyle? To me it’s a no brainer. But it did take time. Time to rewire my brain. To understand and realise what was in my household cleaning items and why things had to change!
My transition into this beautiful, clean lifestyle has been somewhat of a journey when I look back. I didn’t mean for anything to happen the way it did. It came about organically. As you know, the more we educate ourselves the more we make changes to our lives along the way. Whether it be spiritual, physical, mental, wholistic, it’s all about learning and growing. Changing one step at a time no matter how small the step. It’s still in the right direction.
Keeping that in mind- my first step was almost 9 years ago. I was expecting my first child and I kept thinking about the idea of my baby being perfectly safe inside my belly. Bringing him into a world where nothing is perfect. In fact far from it. I had this obsession with creating a safety for him where he felt he was still in the womb. Safe and unharmed. That meant dressing him in a soft and gentle way. The best way that I could possibly do this was to create my own laundry wash and use that on my clothing. That way I was in control of what touched his skin. I wanted to keep my sons baby skin as pure as possible. Over the years I tried a few different ways of making my own low tox laundry wash. It was only this year that I found what I believe is far better than store bought. And really, it only takes me less than five minutes to make two litres of Laundry Wash and Fabric Softener.
But that’s as far as I went for some years. I still used chemicals everyday for everything else.
All this time I was so close yet so far! In my home I loved the beauty in knowing I had never cooked a packet meal ever for my family. I was buying organic meats, washing my fruit and veg (blah, blah… this isn’t a post on food. I have plenty of those already 😉. However I will say here, I promise you reader you can always find a super quick and fast alternative. If I can do it as a busy mum, anyone can do it.)
And so on my journey I truly believed eating a whole foods diet of simple, clean foods that God has put on this earth was all you needed. And it’s by far the greatest thing you can do for yourself and your family and friends.
However, in 2014 I was sitting in church listening to our pastor speak on the gifts Jesus was given at His birth. He read aloud the gifts of ‘Frankincense’ and ‘Myrrh.’ Explaining how these precious items were worth more than gold!
At this point all I can say is I’m glad we were sitting in the back row. I pulled my phone out of my bag… and simply googled just exactly what Frankincense and Myrrh was and why they were considered to be of great value. I was ASTONISHED(!!!) at the information on the health and wellness these resins carry. I couldn’t stop reading and soaking it all in.
From there I stumbled across DōTERRA and let me tell you, that was a whole new level. The HUGE range of 100% unadulterated oils. Frankincense and Myrrh were just two of many. I learnt about the transparency of doTERRA and their indepth testing of their products. I wanted so much to implement this into my family’s life. We were healthy (Praise God), we exercised and now… now I wanted to be free from chemicals in my home. I wanted to know that if one of my children accidentally grabbed hold of my toilet cleaner or surface spray and they sucked on the bottle there would be no fear. I wanted to use products that are natural and from the earths rich resources. In reading and understanding the oils it lead to further questions, how are they derived and who does DōTERRA support? I wanted ethically produced oils.
I soon discovered the sourcing model has made sure they look after their growers and the people on the ground level in all these countries they source from.
Through their Source To You model they are/have cultivated partnerships with artisans, small-scale growers and distilleries. By forming cooperatives with the growers, that means they have had the opportunity to create more jobs and improve income and livelihood for farmers around the world.
My process was slow. In hind sight too slow. I’ve been using essential oils for close to four years now and to be honest I bought whatever oils were the cheapest. I made the mistake of thinking all oils are of the same quality and level. I was so very wrong. And that’s ok. We live and learn. As I kept discovering I couldn’t deny the findings. I couldn’t deny the product testing by third party testers. I strongly felt now was the time for me to take action in my household. Now was the time to create a low tox culture and ditch those chemicals! I couldn’t do it anymore. I couldn’t buy second best. You can’t ‘unknow’ once you know!
My mind went into overdrive. If I could make my own detergents in a matter of minutes how hard would it be to swap all my daily products over?
Friends, I couldn’t believe it. I spent maybe 20 minutes of my day (whilst breastfeeding… look at that multitasking 😂) understanding how to make hand soaps, surfaces sprays, fly spray, toilet cleaner, shampoos, body lotions. You name it, there is a easy low tox alternative for it.
This transition is not hard. Don’t allow it to be. I’ve tried to summarise the easiest way to transition below.
My 5 top tips on Transitioning to Low Tox;
1. Research and understand what your top items are that you need for your low tox life.
You will need:
Pump foaming containers (for hand soaps)
Glass Spray Bottles and nozzles
Rollers
Glass jars and bottles.(for detergents and laundry wash)
Your Essential Oils
Dr Brenner Castile Soap
Bi Carb Soda
Vinegar
Filtered water
*Give or take you’ll need a few extra things. These are always at the top of my list.
2. Don’t try to change everything at once. Wait until your store bought item is finished and then simply replace it. That way you have plenty of time, be it of an evening or weekend to make a note on what you need so you’re ready for the easy transition.
3. Keep your favourite DIY recipes close by and saved. It’s a great idea to pop over to my Instagram page or search my blog under the search bar for anything you’re looking for.
4. Enjoy the process. Find a small moment to read up on your oils. Keep a file on your laptop of all the information you learn along the way. Make learning fun and be creative. Using your oils for beauty products and perfumes become stunning, personal gift ideas.
5. Don’t be afraid to share your love. Often I find in chats with friends or on social media people will mention a struggle either with themselves or someone they love. And that struggle will tend to be physical or mental. Don’t be afraid to offer an idea or even a small house made gift to show you care. You’re listening and also being proactive in your friendship. There’s nothing wrong with ever saying ‘hey, after last weeks chat I thought this roller bottle might help with…’
Too often I get met with comments about it all being so overwhelming and too much effort. Please be encouraged, friend. It really isn’t. ONE STEP AT A TIME. One small purchase at a time.
The low tox life chose me, I promise. And it will chose you.
It’s time you allowed it.
Come and chat with me anytime. I’m here to answer your questions. Or sign up and create your own wholesale account through me.
Let’s do this. Together.
Low Tox Living.
BODY. MIND. HEART. SPIRIT
*The Healing Hands Foundation that doTERRA created is also an incredible organisation, bringing refuge, hope and light to so many less fortunate lives around the world.
I really love making these little crunchy beauties for my family. I love that they change every slightly each time depending what’s i the pantry. Sometimes I use oats, other times it’s rice crackers or cruskits. Whatever you have lying around is fine! Let it be a chance to experiment and enjoy watching your family eat healthy nuggets. It’s such a great feeling knowing what exactly is in your food!
I double the recipe. Adjust to your liking. Or use the next day in salads or lunch boxes.
Ingredients:
1 kg Chicken Breast cut into your liking size.
6-8 Rice and Quinoa Crackers
Small Handful of fresh herbs or 1 Tbsp of mixed herbs
2 Garlic Cloves
1/4 cup Pitted Olives (only if your family love them 😉)
Salt and Pepper
2 eggs whisked
Flour of choice
Olive Oil or Canola for frying
Method:
Place whisked eggs into a bowl
Place as much flour as required into a bowl.
Process all other Ingredients and place into a large bowl.
Add oil to the frypan and set to a medium heat.
Line the bowls up in a production line. Place chicken pieces into the flour and coat well. Then into the eggs to coat further. Roll through the crumb and place into the frypan. Turn when golden brown.
Drain onto paper towel.
*I always cut into a few chunky pieces to make sure they are cooked right through.
Well Christmas is done and dusted… I’m living in a little bubble over here. Wishing it was Christmas everyday- reliving every moment in my mind. But alas, only 362 more day to go 😢 😆
So it got me thinking, what better way to relive Christmas than to share one of my classic side dishes. This one is almost more of a stand out than my Turkey.
Ingredients:
1 whole Jap Pumpkin
6 slices of stale white bread (blended into breadcrumbs)
1 leek
3 cloves of garlic finely diced
4 slices of fresh organic ham cubed
1/4 roughly chopped Roasted Almonds
1/4 cup dried Cranberries
Small carton of Full Cream
150g grated Gyerue Cheese
2 tbsp of Chives chopped finely
3 sprigs of fresh Thyme
2 drops of Rosemary Oil
Method:
Cut a round top off your pumpkin and keep it for later.
Scoop out the seeds leaving a neat deep hollow to place the delicious stuffing.
On a medium heat add butter and oil to the pan.
Place the thinly sliced leek to the pan and sauté until soft.
Add garlic and cook for a further minute.
Add ham, fresh herbs, nuts and cranberries, cook for a further 2 minutes.
Turn off the heat. Add the breadcrumbs, Rosemary Oil and grated cheese. Stir to combine.
Stuff the pumpkin, leaving room for the lid to slide back. Do not jam the stuffing in. You’ll need room for the cream to pour through.
Pour cream over. Use a fork to help distribute it to the bottom and evenly.
Place lid on top.
Oil 2 large sheets of foil.
Wrap the pumpkin in them and place on a tray.
Bake for 2-3 hours (depends on the size of the pumpkin).
Just keep checking.
Serve immediately.
Jennifer X
* note: any left over stuffing just place into a casserole and bake seperate. It will no doubt be gobbled up and serves as a back up!
My Christmas Eve lunch. We cooked the Turducken (Turkey stuffed with Chicken, stuffed with Duck) on the spit. It was moist and sensational! We have a glazed organic ham. The sides were my lovely stuffed pumpkin. Sweet potato casserole, carrot and corn bake, duck fat potatoes and sautéed Brussel Sprouts and peas. This was cooked to feed just our family of 7. It has given us leftovers for days. I simply reheated the leftovers to serve on Christmas Day to accompany my Seafood.
Have you ever gone to a Christmas Cocktail party? Or maybe you just want something that will start off the celebrations with a BANG!
What I love about this cocktail is that I make it for a dessert. Which means no cooking for me (besides toasting a marshmallow 😉). It’s creamy and has those Christmasy elements. Cinnamon, Nutmeg, Butterscotch! It’s really delicious.
Ingredients:
1 drop of Cinnamon Bark Essential Oil
1 shot of Baileys
1 shot of Butterscotch Schnapps
Egg Nog
1 Toasted Marshmallow for Garnish
Grated Nutmeg
Method:
Place the oil in the bottom of your cocktail glass
Add your shots
Top with Eggnog
Place Marshmallow on top carefully. Then garnish with the Nutmeg.
It’s about time I posted this goodie! There’s isn’t a kid I know that doesn’t like Spaghetti…. however once you try mine I can guarantee you would of spoilt them and they will never like anyone else’s.
Keeping things as authentic as I can, this recipe tasted just like the Bolognese I ate throughout Italy.
My secret is in my own sauce. Don’t go buying jars of it if you can. I make mine in bulk and freeze it up for whenever I need.
I’ve been working on for a little while now, I’m putting together my first ‘Christmas Essentials Workshop.’
I want to take the stress out of all your gift giving planning. I have created 12 simple recipes and prepared a list of ingredients you’ll need for each one. You now have a whole month to get any little things you might need- oils, jars, moulds. Get all your bits and pieces together now and on December the 1st I’ll be releasing one recipe a day for 12 days! Be sure to SUBSCRIBE TO MY EMAIL LIST for the recipe cards and other such info!!!!
Also, Be sure to follow along on my Instagram @essentially_focused_ in the lead up and for all my low tox, oily ideas. Let’s get into the Christmas Spirit together.
The recipe booklet is ready for you! Just SUBSCRIBE for the RECIPE CARDS to be sent to your inbox!!!!!
Take a sneak peak at what we will be creating this Christmas as our gift ideas!
Ever wondered why your homemade Hummus didn’t taste like the stuff you eat when dining at a Middle Eastern Restaurant? I’m sure all my Middle Eastern friends who read this will laugh at me… it actually took me about 9 months to test, try and research to finally find the most AUTHENTIC recipe. Honestly!! I would ask anyone I could and they would give me some recipe using canned chickpeas… I mean, there won’t no cans of chickpeas in the old days. I wanted the most original and best recipe I could find.
So here goes.
Ingredients:
1 1/2 cups Dried Chickpeas
4 Garlic Cloves
1/2 cup Tahini
1-2 Tbsp Olive Oil
2- 2 1/2 Lemons (taste as you go)
1 tsp Salt
1 tsp Cumin Powder
2-3 Tbsp Chilled Water
1/2 tsp Bi Carb Soda
Method:
Soak and cover chickpeas overnight
Boil chickpeas in water with 1/2 tsp bicarb soda until soft
Drain
In a processor add all ingredients. Taste and add a little more of what you desire… could be garlic, cumin, lemon juice.
Serve with a drizzle of Olive Oil, Paprika and flat bread.
Yum.
Jennifer X
Ps: the will give me 3 contains worth. I freeze 2 of them and thaw when needed. I’m our family we go through one a week. So I make a fresh batch every 3 weeks! X
Oh yes! The Hubs made this one yesterday. One thing you need to know about me is I will never post anything food or beverage related unless it’s outstanding….. and this truly is!
Anything housemade is sure to have the wow factor. What I love about homemade pasta sauce is, it looks impressive! With very little effort. Typical pasta sauce is based around a peasant diet from the 1700’s. So most of these ingredients are around my home most days to add flavour to other dishes.
Ingredients:
2-4 kilos of Tomatoes. Cut in half
4 Onions, diced
7 cloves of Garlic, minced
4 tbsp Olive Oil
1/2 cup Red Wine
4 tbsp Red Wine Vinegar
4 Bay Leaves
Small bunch of fresh; Basil, Thyme, parsley.
2 tbsp Dried Oregano
2 tbsps of Pepper (or 2-3 anchovies… don’t be scared they do the same thing, add salt!)
Good pinch of Pepper
2 tsp of Bi Carb (to make it less acidic)
Method:
Fry Onions and Garlic in oil
Once slightly browned add all other ingredients.
Simmer for 2 hours. Be careful not to boil it.
Blitz to your own consistently. We prefer it chunky and organic.
Store in air tight glass jars. Freeze until ready to use.